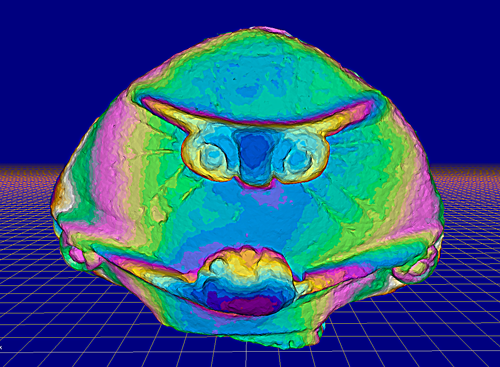
The Yamagata clay figurine 3D model painted in interference color
The interference color repeats in the direction of face height. You can see the 3D model by using the interference color change in the same way as contour lines.
干渉色に塗った山形土偶3Dモデルをつくりました。干渉色は顔面高さ方向に繰り返します。干渉色変化を等高線と同じように利用して3Dモデルを見ることができます。
1 干渉色に塗った山形土偶3Dモデル The Yamagata clay figurine 3D model painted in interference color
干渉色に塗った山形土偶3Dモデル干渉色は顔面高さ方向に繰り返します。干渉色変化を等高線と同じように利用して3Dモデルを見ることができます。
土偶の元3Dモデル:https://skfb.ly/onJHL
干渉色画像は「干渉色変換ツール」(やまだこーじさん開発公開)で作成
The Yamagata clay figurine 3D model painted in interference color
The interference color repeats in the direction of face height. You can see the 3D model by using the interference color change in the same way as contour lines.
Original 3D model of clay figurine: https://skfb.ly/onJHL
Interference color image created with "Interference color conversion tool" (developed by Koji Yamada)
3Dモデルの動画です。
2 メモ
干渉色に塗った山形土偶3Dモデルの画面 1

干渉色に塗った山形土偶3Dモデルの画面 2

干渉色に塗った山形土偶3Dモデルの画面 3
1) フォトグラメトリーソフト(3DF Zephyr Lite)で3Dモデル(メッシュ)作成
2) 3DF Zephyr Liteのメッシュをフィルター→カラーを更新→「高さ」で色のグラデーション表示→Sketchfab投稿
3) Sketchfabからgltfファイルでダウンロード
4) gltfファイルをBlenderにインポート→UV展開→ベイク→Wabefront(.obj)ファイルでエクスポート
5) Wabefront(.obj)ファイルのテクスチャ画像ファイルを干渉色変換ツールで干渉色に変換
6) テクスチャ画像が干渉色となったWabefront(.obj)ファイルを3DF Zephyr Liteにインポート
7) 3DF Zephyr LiteからSketchfabに干渉色モデルをアップロード
8) 3DF Zephyr Liteで動画作成
3 感想
上記手順を見つけるために、見よう見まねの試行錯誤を丸々3日間行いました。無駄な時間のようにも見えますが、結局は乗り越えなければならないハードルであることから、必要な時間投資であったと自分に言い聞かせました。赤色立体原理によるテクスチャ画像作成→赤色立体画像3Dモデルも技術的に可能になりました。
0 件のコメント:
コメントを投稿